How to Create a Win10 VM for Malware Analysis, Forensic or Offensive Tasks
Introduction
This article will walk you through creating a Windows 10 VM for Malware Analysis, Forensic and Offensive Tasks.
Warning
This VM is not for everyone. If you're thinking this is not a good idea, you're right! You should probably skip this article and save yourself some time!
For the rest, lets continue. As one of my heroes use to say...
With great power comes great responsibility.

The VM
The "VM"
Download and Install a Virtualization Software
There are many different flavors of virtualization software. Here are some of the links for easy access:
This article uses VirtualBox however you can any virtualization software.
If you haven't by this point, download and install your virtualization software.
Download a Windows 10 VM
Thanks to Microsoft we can download a VM directly from their website and save the headache and time installing an OS.
Here are different options for Windows 10 VM: * Get a Windows 10 development environment * Test Microsoft Edge/IE version VMs
I prefer the Windows 10 Development environment. It is a little larger than the other VMs, but it comes with Visual Studio 2017 and Windows Subsystem for Linux (Ubuntu) installed. You're getting two installed OSes by just downloading a single VM.
A couple of notes:
Default Windows password for these VMs are 'Passw0rd!'.
Default Bash su/sudo password is 'password'
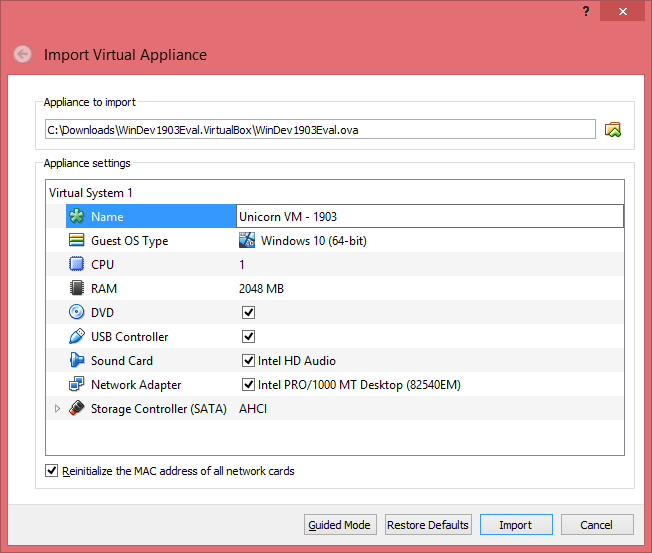
Unicorn VM
Very Important: If you haven't picked a COOL AMAZING name for your VM, stop here and meditate on it. Do Not Proceed until you have done this step.
Okay, lets move on to isolation.
Isolation
On to a more challenging topic, Isolation. This is a NP-hard problem. If you haven't spent some time thinking about isolation yet, stop and meditate on it. Build the perfect isolated environment in your head and then come up with ways to escape it. Here is an article that may help with your meditation.
Some of the questions that you need to think about: * What are the ways something can escape the VM? * What are the likelihood of these ways? * What's the worst thing that can happen if something escapes the VM? * How can I recover (data, system, myself)? * Can the Host be hardened?
This section will vary for every individual. The level of isolation required is propositional to the importance and level of secrecy of the information you have or are close to. Are you or coworkers protecting Propriety information, Patient information or Pandora's box? In the later case, an underground mountain with no internet access may be a wise choice.
A good analyst is mindful of these answers when doing any type of analysis.
Install Guest Tools (Optional)
Most virtualization software have Guest Tools that can be installed on the VM. These tools enable various functionalities, eg: file sharing, clipboard sharing, printing and etc...
Here are some Pros and Cons for installing Guest tools:
Pros
It's easier to share files between host and guest. It's easier to copy and paste commands between the two.
Cons
Some malware can detect these tools and will change their behavior. Higher chance of malware escaping the isolated environment.
Network Isolation
Be mindful of network isolation. Lack of Network isolation is another way malware can escape the VM. If you're reverse engineering a malware, make sure your VM is disconnected from the network or use FakeNet-NG or Host only network.
Host Isolation
If you have resources to use a dedicated Host for this VM, then do it!!!
Configuration and Installation
This section will discuss the configuration of Windows 10 VM and installing the toolkits. The toolkits that are installed in this section are:
- FLARE
- COMMANDO
- SIFT
- KAPE
Windows 10 VM Configuration
Now you have a Windows 10 VM. In this step you will customize and configure the VM for your use.
Perform Windows Update
Run windows update and install all available updates.
Privacy Settings
Take a few minutes to review the privacy settings in the Windows 10 VM. This can be accessed by going to Settings > Privacy.
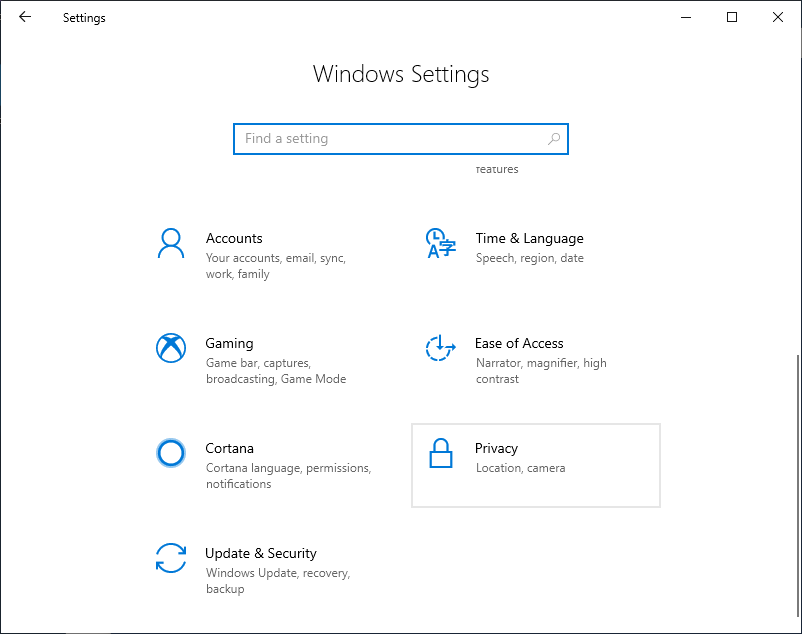
Windows 10 Privacy Settings
Bash/Windows Folder Sharing
You're likely going to be switching between Linux bash and Windows. You can save some time by setting up a couple of symbolic links in Linux. Create two empty folders on your Windows Desktop. You can call them "Malware" and "Tools". You can create the symbolic links in Linux as follow:
sudo ln -s /mnt/c/Users/User/Desktop/Malware ~/
sudo ln -s /mnt/c/Users/User/Desktop/Tools ~/
You can use these folders to quickly transfer files and tools between the two OSes. Beware that malware can escape from these folders!!!
Install FLARE
To install FLARE you need to download the toolkit from here. You will then need to extract the files and run .\install.ps1 in Powershell.
You can view detailed instructions for installing FLARE here.
The setup will reboot the VM a few times to install the tools. The full install may take a few hours depending on the VM performance.
Install COMMANDO
COMMANDO install is similar to FLARE install. First download the toolkit from here. Once the download is complete, extract the files and run .\install.ps1 in Powershell.
You can view detailed instructions for installing COMMANDO here.
The setup will reboot the VM a few times to install the tools. The full install may take a few hours depending on the VM performance.
Install SIFT
SIFT is not fully supported in WSL. However you can install it with the following commands:
wget https://github.com/sans-dfir/sift-cli/releases/download/v1.7.1/sift-cli-linux
wget https://github.com/sans-dfir/sift-cli/releases/download/v1.7.1/sift-cli-linux.sha256.asc

gpg --keyserver pgp.mit.edu --recv-keys 22598A94
gpg --verify sift-cli-linux.sha256.asc
sha256sum -c sift-cli-linux.sha256.asc

sudo mv sift-cli-linux /usr/local/bin/sift
chmod 755 /usr/local/bin/sift

sudo sift install --mode=packages-only
Install olefile
The Oledump tools require olefile. Here are the steps to download and install olefile:
- Downloading the files from here.
- Extract the files and copy them to the Tools folder your desktop.
- Run the following command in bash from the Tools folder:
Sudo python setup.py install
Install KAPE
KAPE is a must have Forensic tool that's been developed by Eric Zimmerman. You can Download it from here.
You can read additional information about this tool here.
Install MS Office (Optional)
This is an optional step. If you do any MS Office Document malware reverse engineering, you may choice to install MS Office.
Cleanup and Snapshot
You're in the last mile, you can see the end and can't wait. There is a few more things you need to do prior to using your VM.
Here are some of the things you need to do:
- Delete the installation files from your VM.
- Empty your Recycle Bin
- Set your favorite background.
- Pin your favorite tools to the taskbar.
- Run Disk Clean up on the VM.
- Run Disk Defrag.
- Run sdelete -z c:
- Compact the VM Disk in your virtualization software.
- VERY IMPORTANT: Take a SNAPSHOT of your VM and give it a name and tag it with "- Clean - DATE".
AND now lets take a few step back and see what we got!!!

Close enough!
Summary
This article provided some references and steps to create a Windows 10 VM for Malware Anlaysis, Offensive and Forensic tasks with FLARE, COMMANDO, SIFT and KAPE.
I hope you enjoyed the article, if this article doesn't contain any of your favorite tools shoot me a message on twitter.